 |
| Commonplace Beauty |
I don't know that I'm a topiary kind of gal but I loved the femininity of this and the fact that they are made from old books is just awesome. Simply beautiful.
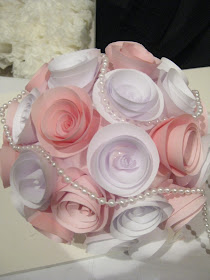
I decided to try making these but since it was for a baby, I just used plain white and pink paper.
 |
| Life: Designed |
Here are the supplies you need:
 |
| Life: Designed |
I was able to find most of these at the dollar store.
Styrofoam balls, wooden dowels, ribbon, boxes for the base (you can use a pot, square box, vase, etc. These silver boxes came in a set of 2 sizes for $1.25. Done deal.
Not pictured here is the hot glue, some beads (optional) and floral foam (for the base).
You'll also need a lot of paper. You can use old books, music sheet, scrapbook paper, etc. I used plain printer paper.
I used this tutorial to make the roses. Do a test and see what looks best with the size ball you have. I used 4" squares for the small ball and slightly larger ones for the bigger ball.
You will need A LOT of these...I made about 200 roses in total for the two balls.
So... at first your roses might look something like this:
 |
| Life: Designed |
At this point I was starting to doubt whether I could pull this off...
But I had bought all the supplies already so I figured I'd might as well keep trying.
When I finally got the hang of rolling the spirals, they looked a lot better:
 |
| Life: Designed |
The army of roses was starting to grow... These actually take a surprisingly long time to make. So take your time making them. Have a movie marathon and keep on cutting, rolling and gluing.
 |
| Life: Designed |
I started the project in the early evening and by midnight I had finished the smaller ball and about 1/4 of the larger ball.
 |
| Life: Designed |
I thought about wrapping some white beads around the roses but instead went with silver bead in the center of some of the roses.
 |
| Life: Designed |
Before you cover the whole ball with the roses, make sure you know where the dowel will go.
For the base, I glued some floral foam inside the box and then pierced it with the dowel- gluing it in place to make it extra sturdy. The boxes I got are a little on the small size and since the ball has some weight to it, it kept wanting to topple over. So I got some rocks and added them to the box to help make it more bottom heavy and it seemed to do the trick.
 |
| Life: Designed |
It cost about $10 to make both of these. Materials are really inexpensive. The time it takes to make is the real expense. So if you have the time, I say go ahead and make some!

Very pretty for Valentine's Day! Thanks for the tutorial!
ReplyDeletemakingitfeellikehome.blogspot.com
Tricia, thanks for dropping by and for the comment!
ReplyDeleteOh! SO cute!! And I LOVE them on the beautiful table you did. Really liked that you used a silver bead in the center of some of the roses. Don't they take the LONGEST time to do!? Crazy. I plan on posting directions one day and warning everyone in huge letters :-). thanks for visiting my blog and for your kind words! Just joined your blog :-).
ReplyDeleteThanks Heather! I had someone say, "How long did it take to make these? Half an hour?" Haha...I nearly choked on the cake. Honestly I don't know if I'd make these again! I think you should post your directions! I love the book pages and the blushed rose affect you used. GORGEOUS! Thanks for joining! I thought I had joined yours already but I guess I missed it! I'm on my way!!
ReplyDeleteThis idea and your blog are so adorable! I would LOVE for you to link this up to my link party!
ReplyDeleteThanks!
- Kathryn
http://www.destinationcraft.blogspot.com/2012/01/destination-cutesy-monday_30.html
Thanks so much Kathryn! Will do!!
ReplyDeleteThese are beautiful, I wish I was artistically blessed!
ReplyDeletexo Shane
shaneprather.blogspot.com
Well they turned out beautiful. Thanks for sharing at our Link It Up Thursday party - you've been busy. :)
ReplyDeleteGreat tutorial. They're beautiful.
ReplyDeleteI do not even know how I ended up here, but I thought this post was good. I don’t know who you are but certainly you’re going to a famous blogger if you aren’t already �� Cheers! 배트맨토토
ReplyDeleteGreat post. I was checking continuously this weblog and I am inspired! Extremely helpful info specially the closing section. I maintain such info much. I used to be seeking this particular information for a long time. Thank you and best of luck. Feel free to visit my website; 카지노사이트
ReplyDeletebape
ReplyDeletekd shoes
bape outlet