 |
| Salvage Love |
The bench we made is 57" long, 16" deep and 16" high.
Since it has a fairly long span, for added strength we doubled up on the 3/4" plywood which my friend's boyfriend glued and set overnight to dry.
 |
| Life Designed |
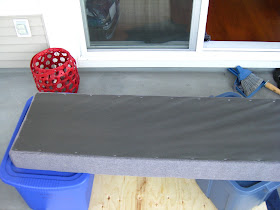
Before we placed the foam, we measured and drilled all necessary holes for the buttons and the legs.
 |
| Life Designed |
I found the legs on Ebay- with shipping, they were about $40 for 4 12" legs. Not bad! We wanted the legs to be angled like the Salvage Love bench so we also bought angled leg plates from Lee Valley.
Note: If you're going to have angled legs, make sure leg feet are adjustable! I've seen similar legs at Home Depot but their feet don't move making an angled leg impossible.
 |
| Life Designed |
We lucked out with the fabric and found a beautiful upholstery grey remnant piece at Fabricana for just $10.49/yard!
 |
| Life Designed |
We also got button kits and a 5" long needle from Fabricana:
 |
| Life Designed |
 |
| Life Designed |
We used fishing wire that we staple gunned in zig zags to make sure the buttons weren't going anywhere:
 |
| Life Designed |
Now here's my advice... and trust me, you'll want to heed this:
You want fairly large pre-drilled holes!! TRUST ME.
I saw pretty large holes in the Savage Love tutorial but they didn't mention why this was important. We just drilled small 1/8" holes.
Why is this a bad idea?
Because, trying to get your needle to find that hole on it's way back down is like trying to find a needle in a hay sack!
To make your life easier, just make your holes about 1/2" - 1" in diameter.
Wrapping the corners is another challenge but a pretty easy one to figure out. It required cutting out some excess fabric and manipulating the fold the way we wanted:
 |
| Life Designed |
OK almost done....
 |
| Life Designed |
 |
| Life Designed |
 |
| Life Designed |
And the CB2 dining table?? Don't even get me started. I can't tell you how beautiful the wood is. The picture doesn't do it justice- it's stunning.
Everything about the table is perfect. I love the metal legs and the gorgeous sheesham wood AKA Indian Rosewood. Bonus: this hardwood is sourced from sustainable, government managed plantations. Hurray for sustainability!
They're still in the process of decorating (new pendant, window coverings, something fabulous on the bench wall, etc.) but so far, this just makes me so happy.
The total cost of the bench was about $150 which is cheaper than one of their chairs, so I'd say it's a fabulous deal!

Your friend's boyfriend is so lucky to have the two of you around. This project came out amazing! This is such a creative post. I would love it if you would share this post at our WIW linky party. Hope you can join us. :-)
ReplyDeletePaula, your newest follower
ivyandelephants.blogspot.com
Great job! Love it!
ReplyDeletethat looks amazing, like a true midcentury piece!
ReplyDeletei love it!
ReplyDeleteThis comment has been removed by the author.
ReplyDeletewrapping corners is always tough. I found this mid-century bench on Trove with the most beautiful corners. I'm obsessed with: Home
ReplyDelete